
Today’s fabrics have become so much more technical and heat transfers are pacing right along with those fabrics when it comes to innovation. Improvements like stronger adhesives, flex materials for stretch and compression wear, lower temps and quicker times are all really opening up options for us when it comes to heat pressing.
Even though the fabrics and materials have changed, your press has not. It still delivers those three critical components: time, temp and pressure. Because materials are now so technical, the window for proper heat application has become much smaller. So, when things go wrong, costs and frustrations can rise quickly.
You may know the ins and outs of your machine but no one knows more about your equipment than the manufacturer’s tech support team. They should be your first call if you have any issues. But here are some steps to identify what’s going on and possibly limp through your job until something can be done. Because let’s face it, things don’t always go wrong Monday through Friday between the hours 8 am and 5 pm. Things happen at the worst times!
Let’s talk about some common issues with pressure and a few ways to check your machine in the field and even a couple options for some work-arounds.
UNDER PRESSURE
Challenge: When pressing a design, the heat press isn’t making full contact with the shirt
Solution: First, make sure that heavy seams, folded under sleeves and collars and other features on the garment aren’t in the way of the platen. Next, rotate the garment 180 degrees and press again. If you have an interchangeable platen, it may be easier to rotate that. If that fixes your issue, great!
However, if you have a larger application, just turning it won’t help. There are some simple tests that will help identify further solutions.
- Turn off your press and let it cool.
- Use a metal straight edge and place it edge-to-edge in various locations looking for gaps between the upper heating platen and the straight edge. Most platens have a finish coating on them try to be careful not to scratch it. Often a tiny light will help if conditions aren’t bright enough.
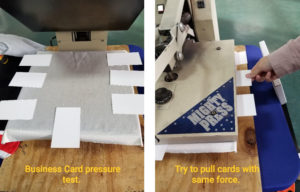
- No straight edge? Try a handful of business cards and place them around the edge of the platen. Leave them hanging off enough to have a little tab to pull when the press is locked down.
- Lock down the press then try to pull the cards out.
- If one or more seem easier to move or even slide out easily, that is your problem area.
To fix it, you can slightly increase the pressure (small adjustment) to fix the problem.
If that doesn’t work, inspect the bottom platen and the rubber pad in that area. Does it look worn? Does the surface look pitted with little holes? If yes, then replace the rubber pad. It’s silicone and a specific durometer (hardness), so save yourself a headache and buy a replacement from the manufacturer.
If the pad looks good, your next step is to get a t-shirt wet until it’s visibly damp all over (not soaking wet, just damp). Next, place the shirt on the heat press and press it you will see steam coming up. Follow this with short 5-10 second presses until the shirt begins to dry. You may have to press a few times depending on how damp the shirt is.
If you notice an area where the garment is damp and maybe even pooling water a bit, there’s another test you can do. Using an interchangeable platen, rotate the platen 180 degrees and do the test again. If the water spot travels, then the problem is the rubber pad. If the spot stays in the same place, then it’s time to inspect the upper platen. If that’s the case, it’s time to enlist the help of some tech support. They may want to look other causes for the problem as well.
It is always recommended to first follow the manufacturer’s instructions. Remember, parts wear out and machines break, but between running some tests and tech support, you’ll find a solution and be back to heat pressing in no time!