The heat press is one of the most versatile and valuable pieces of equipment a decorator can purchase. Unfortunately, they also seem to be the most neglected in terms of proper preventative maintenance and staff training.
These presses can range in cost from the simplest machine at $1,000 to the complex automatic machines going up to $10,000 or more. Because the equipment investment and start-up costs are relatively low many believe they can just put any operator in front of the machine and say go, but I say “No!”
The process is simple, but the finished product is your reputation, so focusing on proper operation deserves your attention. These machines all have three variables that need to be understood: time, temperature and pressure. These settings are of the utmost importance to apply a transfer properly. Understanding the operation of the heat press and performing preventative maintenance will allow the operator to utilize the machine safely and produce products that will last. With garments and heat press transfers becoming more technical, the need to have very accurate time, temperature and pressure readings is paramount.
Let’s get into operating the heat press. They all function on the same general premise: a heating element presses the transfer down onto the fabric for the right time, temperature and pressure. Now, these settings are not the same for every transfer or for every fabric. Many transfers are unique in the settings they require. Always follow the manufacturers recommendations to start and then make minor adjustments from there. These recipes are designed by the transfer manufacturer to achieve peak performance of their products in the most efficient combination possible for the fabric being pressed.
Yes, I did say for the fabric! Manufacturers often have settings that are different for each fabric type.
Why? Let me give you an example, cotton can withstand enormous amounts of heat and take a plastisol transfer up to 365°, whereas a 100% polyester garment may only take 320° or less. It is very important to consult with your transfer manufacturer to be sure you are choosing the best transfer type for the fabric you are decorating. Once you start consulting on your jobs, make yourself a “playbook” and keep track of the setting used for each fabric and transfer combination. This reference will make you much more efficient and ensure your operators are using the same settings each time.
Setting Details
Time: The amount of time the heated platen will press the transfer to the garment. This is a very important setting. Too little time and the adhesive will not melt. Too much time and the adhesive will melt through the garment causing the transfer to fail. It could also cause scorching of the fabric.
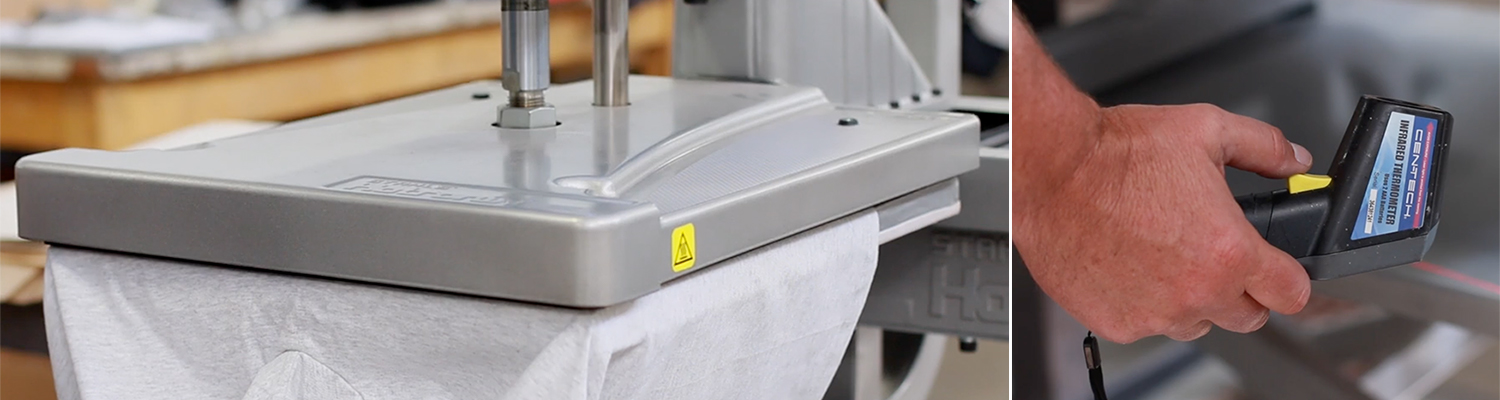
Temperature: The temperature of the heating element on the top, bottom or both. Temperature is another crucial setting that can cause some of the same issues seen above, but the most common issue is transfer failure. Not having enough heat will either cause the transfer not to adhere or worse, it looks good but fails after your customer gets it. The correct heat combined with the correct amount of time will allow the adhesives to melt to the right consistency to penetrate the fibers. Having a calibrated heat press helps insure repeated success. Keep test strips on hand as they are much more reliable than non-contact infra-red devices for testing the accuracy of the temperature of your heat press.
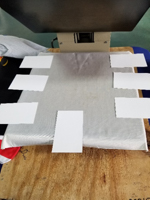 Pressure: The pressure relates to the pounds per square inch of down force applied to the transfer and garment. I cannot count how many times I have heard “more pressure is better.” This is truly not the case. Different transfer types have unique settings as low as 20 to 30 psi and can get up to 60 to 80 psi. Too little pressure and a transfer may not stick due to the adhesive not getting pressed into the fibers. Too much pressure can cause the adhesive to push out on the sides of the transfer or through the garment. This can cause a blurry effect on the transfer and even cause transfer failure. Below is an example of a quick and easy pressure test that may indicate an uneven platen or worn silicone pad. Place business cards around edges, lock your press down and tug the cards. Any that pull easier than other indicate areas of concern.
The magic happens when all of these settings are in alignment with the manufacturer’s recommendations. Assuming all transfers are the same will cause your operators a lot of time and heartache, not to mention the additional costs of replacing garments and transfers due to failure.
So, we know how to make the magic happen. Now, let’s talk about preventative maintenance. Heat presses have many moving parts. Some have pneumatics and most have non-stick coated heating elements and silicone lower pads.
What could go wrong?
Heating Element: These parts are usually coated with a nonstick of some sort to protect the element from a transfer sticking to it. When a heating element starts to get dirty, scratched and “gunked up,” it creates cold spots and uneven pressure.

These situations can cause all sorts of transfer failures and even cause spots to transfer to the garment.
What do we do? Keep your heating elements clean. After each shift the operator should use a piece of clean, soft cotton to wipe down the surface of the platen. This will ensure transfer residue, fibers for the garments and other pollutants do not accumulate on the surface. If a transfer is applied incorrectly and sticks to the platen it is best practice to stop production and completely clean the surface of transfer residue. Remember that the machine is hot. Be very careful when you remove the transfer and wipe it down. I always suggest having a pair of heat resistant gloves near the machine just for this purpose.
Pneumatics: If your machine is air driven be sure to keep your hoses in good shape and check for good connections and leaks when you do your preventative maintenance. Keep your water trap clean and empty. If you notice excessive water check your air source for potential failure. Keeping all of this in good working condition will ensure you are receiving the correct amount of air pressure to operate your equipment properly. This applies to machines with gas springs or shocks to assist with raising the platen automatically.
Grease/Lubrication: Heat presses have many moving parts, joints and pivot points. These may require regular lubrication or greasing. If these parts begin to wear it will hamper the heat press’ operation and could cause untimely and expensive repairs. Always read your manuals and follow the manufacturers recommended cycle for maintenance. Be mindful of using a high heat grease in areas exposed to heat, like the threaded area on machines with manual center post pressure adjustments.
Some areas to pay attention to: Center post pressure, gas shocks and pivot points on handles.
 Dust and Dirt: Heat presses have many surfaces and like all equipment should be wiped down and cleaned often. Excessive buildup of debris on surfaces, joints and pivots points will accelerate wear to your machine and make them much less reliable.
Lower Platens: The lower platen usually come with a rubberized/silicone pad that your garment lays on. I always recommend a Teflon cover for these platens. Over time the edges of the rubber begin to wear and become round. If this goes too far it can create uneven pressure and contact of the platen.
Keep it clean, train your operators and consult with your equipment manufacturers for the best preventative maintenance practices. Remember, your heat transfer manufacturer is the most knowledgeable expert about their transfers types. Consult with them on a regular basis to be sure the best transfers for the art and fabrics your trying combine are selected.
Happy pressing!